Dark and mysterious. The as yet unnamed Viking scope.
Thanks to Tim the
Viking we have had a chance to test one of a new range of scopes
coming on market this summer. The name and exact price of this new
model are yet to be confirmed, but it will be coming in at sub-£1000
with an 80mm and 65mm version. The un-badged pre-production example
of the 80mm we have been given to test is a fully specified sample
that is identical in terms of build quality and optics as the
production models will be.
First impressions are
of a slim medium-weight 80mm scope with barrel focusing, slightly
matt finish rubber armouring, a sturdy feeling lockable bayonet
eyepiece mount and a 25-75x zoom. The important bit is what you see
through it however and it does not disappoint here either. The image
trough the ED glass is sharp and bright with virtually no fringing
and both the contrast and colour fidelity are excellent for a scope
of this price. The comfort is also striking, the rounded twist-up
eye cup fits the eye nicely and the focusing ring is responsive with
no play and just the right amount of smooth damping to be easily
controlled.
We are looking forward
to getting these in stock as they will be a serious contender for
anyone looking to get a high quality scope for less than £1000.
Watch this space for
more information on exact price and availability.
To get the best out of
any telescope you need to have it mounted as steadily as possible, so
a good tripod suitable for your requirements is essential. First of
all we must look at the anatomy of a tripod. Essentially there are
two elements: the legs and the head. Many of the lower cost tripods
available (£40-£100) come as a kit of legs and head, when spending
a little more you get the option of making your own combination.
The legs are the part
that gives the majority of the stability and the weight of the
tripod, and here there are two key specifications to consider: the
material they are made form and the overall size, both when folded
and fully extended.
Carbon fibre is a woven
material giving strength
in all directions.
There are two types of
material commonly used for legs. Most are made from aluminium alloy,
being both light weigh and strong, but if you want the best
combination of low weight and maximum rigidity then carbon fibre is
the way to go.
The head is the
critical interface between the tripod and scope, an inappropriate or
poor quality head can spoil a good scope so this is the part to get
right. Below are the three main types.
2-way (pan and tilt)
and video heads.
The Manfrotto 128 head easily supports
even the heaviest scopes.
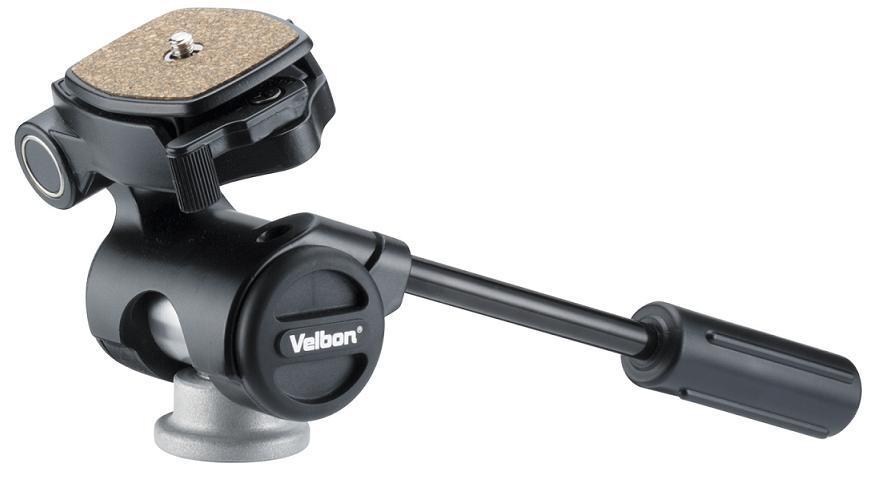
Velbon PH-157Q
These are generally the
best for use with scopes, having the minimum number of moving parts.
The best head we have come across in the last 11 years is the
Manfrotto 128 RC2, which gives a beautifully smooth movement and has
proved to withstand even the most extreme amount of use and weather
conditions unscathed. This type is the best for a scope and is good
for wildlife photography with a telephoto lens, especially birds in
flight. The Velbon PH-157Q is primarily a 2-way head, both movements
controlled with one handle, but the top can be flipped through 90°
to allow for portrait format shots.
3-way (pan, tilt and
landscape/portrait orientation) heads.
These are designed to
be compatible with both scopes and for photography. This type is
often lighter than a fluid video head but are usually less
controllable. Great for switching between a scope and landscape or
macro photography.
Ball heads. Primarily for
photography, these offer the greatest freedom of movement. This
quality is desirable for taking photos with wide angle and macro and
standard lenses, but can be very awkward for a telescope.
The size of tripod you
require depends both on your hight and on where you intend to use it.
For general use a three-section leg tripod (one with two clips on
each leg) is often the best, but if you want it to fit in a rucksack
or a suitcase for travelling abroad then a four-section leg will
retract to a smaller size.
When it comes to
carrying a scope and tripod together there are a couple of options, a
shoulder strap attached to the tripod or one of our Mule Packs, which
effectively turns the tripod into a backpack. Having the weight
supported on both shoulders makes the scope and tripod seem lighter
and leaves you hands completely free for using your binoculars. It
can be tempting to carry your kit by the strap on the scopes case
with the tripod hanging below, but in our experience this can strip
the thread on the foot of the scope which can lead to expensive
repairs.
Visit us at Glandford
and Cley Marshes to try out our tripods.
Here at Cley Spy we
have a no pressure approach to selling optics. As an entirely
independent company we have no reason to favour any one brand over
the others, we just give each individual customer as wider choice of
equipment within their budget as possible. All we do is offer expert
advice if required and let you take as long as you need to find the
one that works for you testing them on real birds 'in the field'.
And where better to do this than looking over one of Britain's best
known nature reserves at Cley Marshes.
When the Norfolk
Wildlife Trust opened their new visitor centre at Cley in 2007, the
opportunity came up for us to have a small shop in the old thatched
Dick Bagnell-Oakley visitor centre just next door to the new one.
From here you get an elevated view over the reed beds, scrapes and
pools out to the shingle bank and the sea around a kilometre away.
As well as the impressive list of regular species found at Cley we
have had a few notable rarities and scarcities seen from the shop
including collard pratincole, western sandpiper, red-backed shrike,
water pipit, black redstart and Wilson's phalarope amongst the
highlights. Cley's coastal freshwater marsh (the product of medieval
land drainage) is an unusual habitat nationally and this coupled with
its location on the North Sea, makes it an attractive area for
regular and vagrant species.
The view from the front windows.
Since we opened here
the view has changed a little. In November 2007 a bout of storms and
high seas opened up some gaps in the shingle ridge and flooded parts
of the reserve with seawater. The marshes soon recovered, but the
impact can still be seen in profile of the shingle and the absence of
Arkwright’s Café in the beach car park. Another source of
interest has been the ongoing construction of the Sheringham Shoal
offshore wind farm, visible in the distance from the visitor centre.
The array of 88 turbines each standing 80m (260ft) tall are
impressive enough but the vessels required for such a project are
great feats of engineering too. When completed (target date summer
2012) they will produce enough power for 220,000 homes.
As with any other area
the best time for finding a rare vagrant bird is in the spring and
autumn, but at any time of the year the there is something worth
seeing at Cley, not to mention the excellent café in the new centre
next door!
Come and visit us at
Cley next time you're on the North Norfolk coast, we are open all
year seven days a week.
Digiscoping (taking
photographs or video through a telescope) can be a frustrating part
of birdwatching and seem like a bit of a dark art, but it can be made
a lot easier with the right equipment, techniques and some practice.
The appeal is obvious; using a telescope both for viewing and as a
long-focus lens, often with a relatively cheap camera getting
respectable results and offering magnifications beyond the
capabilities of even the most expensive SLR camera lenses. The possibilities of
this photographic form can be seen in the entries for Swarovski's digiscoper of the year. With advances in camera technology and better adapters on the market digiscoping has become very popular.
Hoopoe digiscoped.
The equipment required
is a short list:
A telescope.
A device capable of recording an image.
A means of attaching
this device to the scope.
Any scope will do to an
extent. The easiest to use are those with a larger diameter eyepiece
lens. These days this really only excludes some of the older second
hand scopes with early zooms. Also the larger the objective lens the
better, because this gives a brighter image allowing faster shutter
speeds.
The camera is a bit
more critical, and there are a few options for
how you can digiscope. The most popular way is to use a small
compact digital camera held up to the eyepiece. This method is often
the most convenient and is the least disruptive
to using the scope for its intended purpose of viewing
wildlife. For this a small compact camera with an optical zoom range
of no more than 3-4x is ideal. Any greater zoom often means you
can't get rid of vignetting (dark corners to the image or a circular
image), and sometimes makes it hard to get sharp results. It may
seem counter intuitive, but it is often the cheaper, lower-specified
cameras that give the best results. Top-of-the-range compact cameras
such as the Leica X1, Canon G1X or Fujifilm X10 may be outstanding
photographically, but their large sensors and wide maximum apertures
impair their digiscoping performance.
The alternative to a
compact is an interchangeable lens camera (digital SLR (DSLR) or a
mirrorless system such as micro four-thirds). These cameras can be
used in a similar way to compacts in that you can have a lens
attached and take photographs through the eyepiece, but on some
manufacturer's scopes adapters are available that go in the place of
the eyepiece.
Hand-held digiscoping often produces
results like this.
You can get passable
results hand-holding a compact camera or an DSLR with a lens up to
the scope eyepiece but the results can be very hit-and-miss and often look something like the photo on the right. for sharp and steady shots it is best to have
a rigid connection that holds the camera in perfect alignment. The
adapter required depends on the scope and camera you have. Some
manufacturers have their own adapters specifically designed for their
scopes, and these tend to work the best, but there are also universal adapters that enable photography using a wide variety of older scopes
and models that don't have their own adapters.
One of the neatest
digiscoping kits available is offered by Opticron. In the box you
get a Panasonic camera (a good pocket-sized camera in its own
right) and a compact mounting bracket and tube custom-made for the
camera. This fits onto Opticron's HDF zoom and fixed magnification
eyepieces and an alternative tube is available for the new SDL zoom.
For a quick and easy adapter for Opticron scopes (and some others
makes with similar diameter eyepieces) this takes some beating.
Opticron also have an adapter for DSLRs.
Swarovski produce what is probably the best engineered range of adapters, each designed to suit different cameras and
requirements. Both of the adapter are available for the ATX/STX and ATS/STS scopes. For those wishing to use a compact camera and switch
rapidly between viewing and taking photos there is the DCB II swing-over bracket which keeps the camera held over the scope body when viewing
and allows it to click perfectly into place when you want to take a
picture.
Below is a video demonstrating the DCB II on the ATX range of scopes.
If you are going
to be mostly taking photos and want the best image quality and
advantages of a DSLR's low-light performance, manual control and
better sound recording with video then the TLS APO adapter is best. Below is a video demonstrating the TLS APO on the ATS/STS scopes.
Photo by Eddie Myers on an iPhone 4
Mobile phone digiscoping
Many mobile phones now
have reasonably good cameras capable of recording high-resolution
stills and video and they can be used for “phonescoping”. The quality of cameras built into mobile and smart phones has reached a point where they have the performance of many pocket sized compact cameras. This has revived interest in digiscoping with phone cameras and the appeal is clear, having one lightweight piece of equipment that performs the roles of communication and photography. Add to this the possibilities offered by smart phones of uploading photos to the internet and emailing them out in the field and even live streaming video and there is great potential for this type of photography. Just like digiscoping with a conventional camera the results are greatly improved with an adapter that can hold the phone securely in the correct alignment. Kowa and Meopta make bespoke adapters for Apple iPhones and Viking make a very capable light weight universal phone adapter. A feature of the iPhone that makes it especially suitable for digiscoping is the ability to use the volume control on the headphone wire as a remote shutter release.
Why do digiscoping
Sparrowhawk outside our
Glandford shop
Digiscoping will never
deliver the image quality that can be achieved with a DSLR and a
dedicated long telephoto lens, but it does have some significant
advantages. For starters there is the weight and bulk of the
equipment you are carrying. A DSLR and a 400mm + lens is not small
and light by any means, and realistically you have to make a choice
between taking a scope or a camera and long lens. If you are out
birdwatching with binoculars and scope, the additional equipment
required to digiscope is quite light and compact. Then there is the
magnification. Even an 800mm lens, the longest available for many
cameras, gives a magnification equivalent to about 16x on a typical
APS-C sized sensor DSLR. Digiscoping however can deliver a lot more.
Most zoom eyepieces on scopes start at 20x and this is multiplied by
the magnification provided by the camera. My own compact camera
works best on a scope when zoomed in to 110mm, or about 1.5x
magnification (75mm = 1x), this gives a total magnification of 30x,
the same as a 1500mm lens on a DSLR (taking into account the 1.5x
crop factor of most DSLRs). I apologise if this seems like a load of
jargon-filled gobbledygook, but this is hard to avoid when talking
photography. In simple terms a cheap compact camera attached to a
telescope can give you magnifications beyond the reach of the best
telephoto lenses. And finally there is the cost. A digiscoping
set-up can range in price from around £160 for the scope and
adapter plus about £100 or so for a camera, to a top-of-the-range
scope with a digiscoping adapter and camera for around £2500.
Compare that to a DSLR and 500mm or 800mm lens and you will be
looking at a price range more like £1500-£15000.
In addition to stills
photography most digital cameras and smart phones can now record video, many in
high-definition, which can be an excellent way of recording the
behaviour of birds and mammals. Another advantage of video is that
it is often possible to get good results in poorer light conditions
than with stills. For some examples of the kind of results that can
be achieved see video of a lesser redpoll above and our Flickr page. These videos were recorded in full HD, but have had to be scaled down for the internet.
River warbler digiscoped in very
early mornin light
For me the best part of
digiscoping is the ability it gives you to get a record of birds you
have seen and as an aid to identification after the fact. Many
birdwatchers have encountered unusual gulls in odd stages of moult or
mystery waders that manage to look like at least three different
species at once, and in these situations having a photo or a short
video can assist with a positive identification or lend weight to
your claim of a slender-billed curlew on your local patch.
Digiscoping is not restricted to telescopes, it is possible to get photos through binoculars and microscopes aswell.
The stamen and pollen of a common
field speedwell flower. The total area
of this uncropped picture is less than
2mm across
Compact attached to a microscope.
A few hints and
tips.
When
putting a camera up to the eyepiece of a scope it is sometimes
tempting to get it as close to the eye lens as possible, but it is
often better to have it a few mm to a cm away. You wouldn't press
your eyeball onto the eyepiece.
Select
the shooting mode on your camera that prioritises the widest aperture
and fastest shutter speed (e.g. aperture priority (Av) or “Sports”
etc.)
If
your camera has an auto-focus assist lamp turn it off because when
digiscoping it will be pointing at either the back of the scope or
the ground, not what you want it to focus on.
For
the same reasons turn the flash off.
And
finally, do not despair. Digiscoping takes a bit of practice and a
lot of patience, but can be a great enhancement to the enjoyment of
birdwatching.
Focal length and
magnification explained.
The
magnification of nature watching telescopes and binoculars is
expressed as how many times closer the object you are looking at
appears (e.g. 8x). With camera lenses the magnifying power is
expressed as a focal length in mm (e.g. 500mm). Before the days of
digital cameras the size of the area that an image was recorded on
depended on the type of film the camera used. The most popular size
used in SLR cameras and point-and-shoot compact cameras was 35mm
(actual dimensions 36mm x 24mm) and this is still
used as a reference for digital cameras. The most common size of
sensor in digital SLR cameras is known as APS-C size, which has an
area smaller than that of 35mm film. This is know as the crop factor
of the sensor because it has the affect of cropping the image
projected by the lens and so magnifying it. APS-C sensors magnify
the image by 1.5x compared to 35mm film, so a 500mm lens on a DSLR is
the equivalent of a 750mm lens on a 35mm film SLR. Compact digital
cameras have even smaller sensors, but still often give the focal
length range in terms of 35mm film equivalent. One common
misconception is that a compact camera with a 4x zoom offers 4x
magnification, but in this case the 4x referrers to the zoom range,
which is 4x the shortest focal length. As an example my digital
compact has a 4x zoom, with the shortest focal length being 28mm and
the longest being 112mm, or 28 multiplied by 4. 112mm is in fact
1.49x magnification, because a focal length of 75mm is approximately
1x magnification.
The finest binoculars
available to humanity are masterpieces of design and engineering
using cutting edge chemical and material process. The very best fall
into the £1200-£2000 range, but recently there have been a few
models launched by the big names that are highly specified but coming
in with a more modest price tag than their flagship lines. Although
these are the second from top in the product line ups from their
respective manufacturers they offer a lot of performance and are far
from just also rans. Here is a quick overview of four of the best.
This is the new version
of the popular rugged DBA, now with a magnesium body taking the
weight down by 50g to 656g. These are an excellent all-rounder;
light weigh and compact for a 42mm binocular, respectable close focus
to 2.2m, fully waterproofed and grippy hard-wearing rubber armouring.
The image is close to that of the Aurora in terms of quality,
delivering sharp, bright and high-contrast view. In the hand they
feel high-quality, well balanced and solid, with a smooth and
consistent movement on the focus wheel and ribbed, matt finished
rubber. The DBAs have all the latest lens coatings offered by
Opticron and a reassuring 30 year warranty.
The latest addition to
this line up, launched at the end of march. We were impressed with
these as soon as we saw them, and even more so when we looked through
them. The technical specification chart resembles that of top of
range models and this backed up by using them in the real world.
Without wishing to repeat myself the contrast, brightness and
sharpness are all excellent, and the build quality is to a very high
standard with one of the best feeling focus wheels of any binocular
at regardless of price. These have Zeiss's T* and water and grease
repellent LotuTec coatings and a 10 year warranty.
The
well-respected Trinovid name returns in a new incarnation launched
this year, and it does a fine job of upholding the reputation for
excellent optics in tough go anywhere bodies. With a price tag more
than £300 below that of the Ultravids, they have have already proved
very popular because the image is so good and the build quality feels
outstanding. Leica is one of the legendary names in optics and they
have only enhanced their reputation with this new model. 10 year
warranty.
These
are the heaviest of this bunch at 832g, but they are well balanced
and feel remarkably comfortable in the hand. In terms of image
quality these are the exception in this group, in that they are to
the same standard as the top model the EL Swarovision, both having
fluorite lenses and the full compliment of Swarovski's latest lens
coatings. The difference lies in the tailoring of the coatings and
optical system and the design of the body. The SLCs have always been
mainly aimed at the hunting market, where brightness and durability
are just as important as the sharpness and contrast and more
important than colour fidelity. The theory behind the SLCs is that
the lens coatings are fine-tuned for maximum light transmission,
whereas the ELs coatings deliver the most accurate colours as desired
by birders when scrutinising the infinite shades of
greeny-yellowy-browny grey of Western Palearctic warblers. In
reality the difference is minimal, both the EL and the SLC giving
excellent brightness and colour rendition. The ELs also carry the
'Swarovision' specification, for a full explanation of the benefits
of this see Swarovski's website. These have 10 year warranties and
are backed up Swarovski's superb after-sales service.
You
can view more details and order all of these from our website or
visit us in Norfolk to try them for yourself.
After a good pair of
binoculars a telescope is the next most important tool for the
birdwatcher, offering higher magnifications for detailed and
long-range viewing.
Out in the field.
Scope, tripod and Mule Pack ready for action.
Here I will be focusing
on telescopes for birdwatching which are almost exclusively of the
refracting type with an objective lens at the end and use prisms to fit a long focal length in a compact
body in the same way as binoculars do. The other kind of telescope
often seen is the reflecting type which uses a two mirrors, a large one at the back and a smaller secondary mirror at the front to focus
the light into an eyepiece. This type of scope is favoured for
astronomy because it is easier to make very large high-quality
mirrors for good light gathering than it is to make large lenses of
the same quality. Amateur astronomer will use scopes with mirrors of
8 inches (200mm) or bigger, something that would be extremely
expensive if not nearly impossible with a refracting scope.
Astronomical scopes are typically set up semi-permanently in one
place, birdwatchers however require scopes to be rugged, weather
resistant or waterproof and portable, making the refracting type a
much better option.
Reflecting and refracting astronomical telescopes.
A typical birdwatching scope.
This also shows the two types of body available with
straight and angled eyepieces
So what do telescopes do
that binoculars can't?
Binoculars are mostly
between seven and twelve times magnification with eight and ten times
being the most common and versatile. Scopes however, typically have
magnification between 15 and 75 times depending on the eyepiece. As
with binoculars the brightness of the image is determined by the
magnification and the diameter of the front (objective) lens. Our
video on binocular specifications is worth a look because the same
principles apply to telescopes. Basically the larger the objective
lens, the brighter the image will be, but the higher the
magnification, the darker the image becomes.
Larger scopes,
typically with a 77mm-100mm objective lens, are the best for a bright
image and higher magnifications, but are heavier and less portable
than mid-sized scopes, typically with 60mm-70mm objective lenses.
The smallest and lightest are scopes like the Nikon ED50 and the
Opticron GS52 ED, which with objective lenses of 50mm and 52mm
respectively making them ideal for travel and carrying long
distances, but compromised in poor light. Whilst the brightest image
and highest magnifications may be appealing, I have known people with
large heavy scopes that they often leave at home or in the car
because of the inconvenience carrying them.
After you have settled
on a size of scope suitable for your needs the next decision is between a straight or angled eyepiece mount on the scope body. This is a matter of personal preference, but it is usually easier for two people to share an angled scope because straight scopes need to be positioned at exactly the right height. the
eyepiece.
Then we come to the eyepiece itself Most cheaper scopes come supplied with a zoom eyepiece
usually covering the range 15-45x magnification on 60-65mm scopes and
20-60x on 80-85mm scopes. Higher up the price range there is often a
choice between a zoom and a range of fixed magnification eyepieces
(for example 20x, 30x and 45x). These are more restricted than a zoom
in that you cannot change magnification without changing eyepiece,
but they are still popular with some birders because you get a wider
field of view and often a slightly brighter and sharper image
compared with a zoom at the same magnification. At the top of the
range Leica and Swarovski make wide angle zooms covering the 25-50x
range which offer a field of view similar to the fixed magnification
eyepieces.
As with binoculars the
main improvement as you go up the price range is the quality of the
glass. The build quality does increase too, but this is not a
criticism of the construction of the budget and mid-range scopes,
which are designed very well to cope with use in field.
The same terminology
referring to glass types and quality in binoculars applies here too,
there is a short glossary of commonly used terms and acronyms at the
end of this blog.
Another feature that
varies between manufactures and models is the focusing control.
There are basically two main types: a wheel mounted on the prism
housing and a ring around the whole body like you would find on a
camera lens. Some scopes with the wheel type have two wheels, one
high geared and one low geared, for fast and precise focusing. The
Zeiss Diascopes are unique in having this feature built into one
control that responds to how fast you turn the wheel. Which one of
these is right for you is a mater of personal preference and both
systems are quickly adapted to.
While most scopes are
waterproof and fairly rugged, another popular accessory is a
stay-on-case. These add an extra layer of protection to the scope
and eyepiece keeping the outside in better condition and, as the name
suggest, stay on the scope when in use.
With the high
magnifications offered by telescopes a suitable tripod is essential
to get a steady view. All telescopes and cameras use a standardised
screw thread size to fit them to a tripod. Most modern tripods have
a quick release system that allows you to remove and refit the scope
without having to unscrew it. These work by having a small metal
plate that screws into the foot of the scope which then clips into
the tripod head. Some tripods come as a complete kit of legs and
head, others you can choose the best combination for you
requirements. The size of your scope influences the tripod you need,
smaller scopes can use lighter tripods than larger scopes and still
be steady. Another factor that effects the weight of a tripod is the
material it is made from. Most low to mid range tripods are made
from light-weight aluminium tubing, but the top of the range are
carbon fibre. The same qualities that make this material ideal for
sports cars and aircraft make for strong, ridged and light tripods.
So, that's a round up of what telescopes are all about, have a look at our
website or visit us at Glandford or Cley for our full range of
telescopes and tripod.
Cley Spy
Glossary
APO.Abbreviation of apochromatic. A
completely apochromatic lens system corrects all chromatic aberration
(colour fringing). Leica's
APO-Televid scopes also have fluorite lens elements.
BK-7 and BAK-4
prisms.These are two grades of
glass, boroscilicate BK-7 (generally in cheaper optics) and barium
crown BAK-4 (delivering better sharpness)
ED, HD, HR,
Prominar. Terms used to denote
higher-quality glass models, HD standing for High Definition, ED
usually standing for Extra-low Dispersion, and HR standing for High
Resolution. These terms are not standardised, one companies standard
glass can sometimes be as good as another's HD. With Swarovski HD
denotes models with fluorite lenses. Prominar is a term unique to
Kowa and again denotes the higher quality glass versions, including
the impressive fluorite-lensed TSN-883 with its 88mm
objectives.
Eye relief. This
is the distance that your eye should be from the eyepiece lens to get
the optimum image. Spectacle wearers often need a longer eye relief
when using a scope or binoculars with there glasses on.
Nitrogen filled.
Waterproof scopes and
binoculars are often filled with a dry, inert gas (most commonly
nitrogen or argon) to prevent internal fogging.
Taking advantage of the continuing warm sunny weather we have been very busy in the garden. The pond has been dug, lined, filled and fruit trees and shrubs have been planted. The Pond is still looking a bit new, but we've done our best to make it look natural and blend the edges into the surroundings. In the middle there are some water lilly pads and around the edge in the boggy areas we put in some sedge, yellow flag iris, forget-me-not and figwort.
The finished pond in all its glory.
Three of the locals.
The pond has already attracted six ducks and a pond skater within hours of being filled, so it's looking promising! The water level will be topped up every time it rains not only in the obvious way, but also via the gutters on the shop which we have connected to the pond.
Ornamental pile of railway sleepers.
We have also created two platforms in the long grass near by out of old railway sleepers which will provide sheltering and basking places for reptiles and amphibians. The untidy areas of a garden are often the most attractive to wildlife and require the least effort to maintain.
The cherry tree.
The fruit trees are primarily for the insects in spring and summer and birds later in the year. We have two varieties of apple, Snadringham and Saturn, both later fruiting to coincide with the migrating thrushes arriving, a cherry which the blackbirds will like, and a hazel to tempt the great-spotted woodpeckers down from the woods. Planting these trees tested our endurance because the dry ground had become like concrete, requiring a pick axe to start the holes. With a big hole filled with lots of compost and a bit of watering these should do well in spite of the soil conditions.
The latest Cley Spy bird news is red kites at both the Glandford and Cley reserve shops, Mediterranean gull at Glandford and a black redstart at Cley. Also one of the nest boxes has been occupied by blue tits.
We'll keep you posted on all the sighting here and on our Twitter and there are more photos on our Flickr too.




+1-3.jpg)


